cPanel & WHM’s main shared IP address is used by new shared hosting accounts created on a server. This allows web hosts to create new accounts easily and automates the otherwise complex and time-consuming domain and web server configuration process. But what if you want to change the main shared IP address on your cPanel server?
In this article, we outline a three-step process for changing a server’s shared IP address. Changing the main shared IP is straightforward, but we assume you would like to add a new IP address, change the primary shared hosting address, and migrate existing shared hosting accounts to the new address. You can complete each of these tasks quickly within cPanel & WHM.
To follow along, you need root access to a server managed with cPanel & WHM—we’ll be working in the WHM server administration interface. We’ll focus on IPv4 addresses, but a similar process also works for IPv6 addresses.
How to Add a New IP Address to Your Server
First, you will need to arrange for a new IP address with your hosting provider. They will supply an IP from their available address space and configure their network to connect it to your server. In addition to the IP address, you also need the network’s subnet mask. Subnet masks depend on the network’s configuration, so you may have to ask your hosting provider which to use.
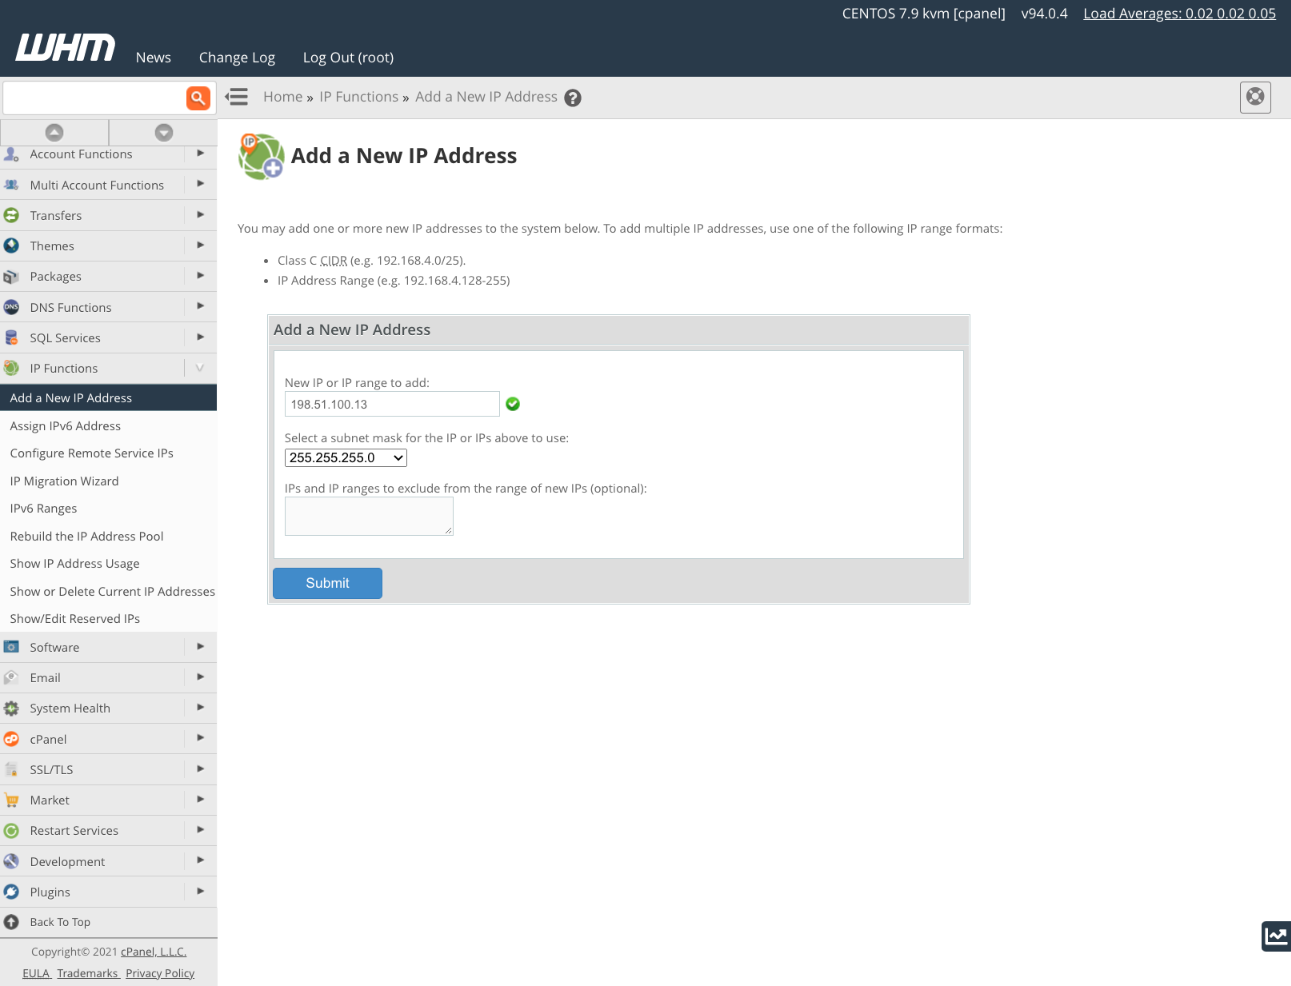
Once you have a new IP address, you can configure your server to use it with WHM’s Add a New IP Address tool, which you will find under IP Functions in the WHM sidebar menu.

For more information about adding a new IP address, see How To Redirect An IP To A Domain & Configure Domain Redirects In cPanel.
How to Change Main Shared IP Address
Now that your new IP address is available for use within cPanel & WHM, the next step is to change the main shared IP address. The new address will be used when you create cPanel accounts in the future. Changing the IP address doesn’t migrate existing shared hosting accounts, but we’ll explain how to do that in the next section.
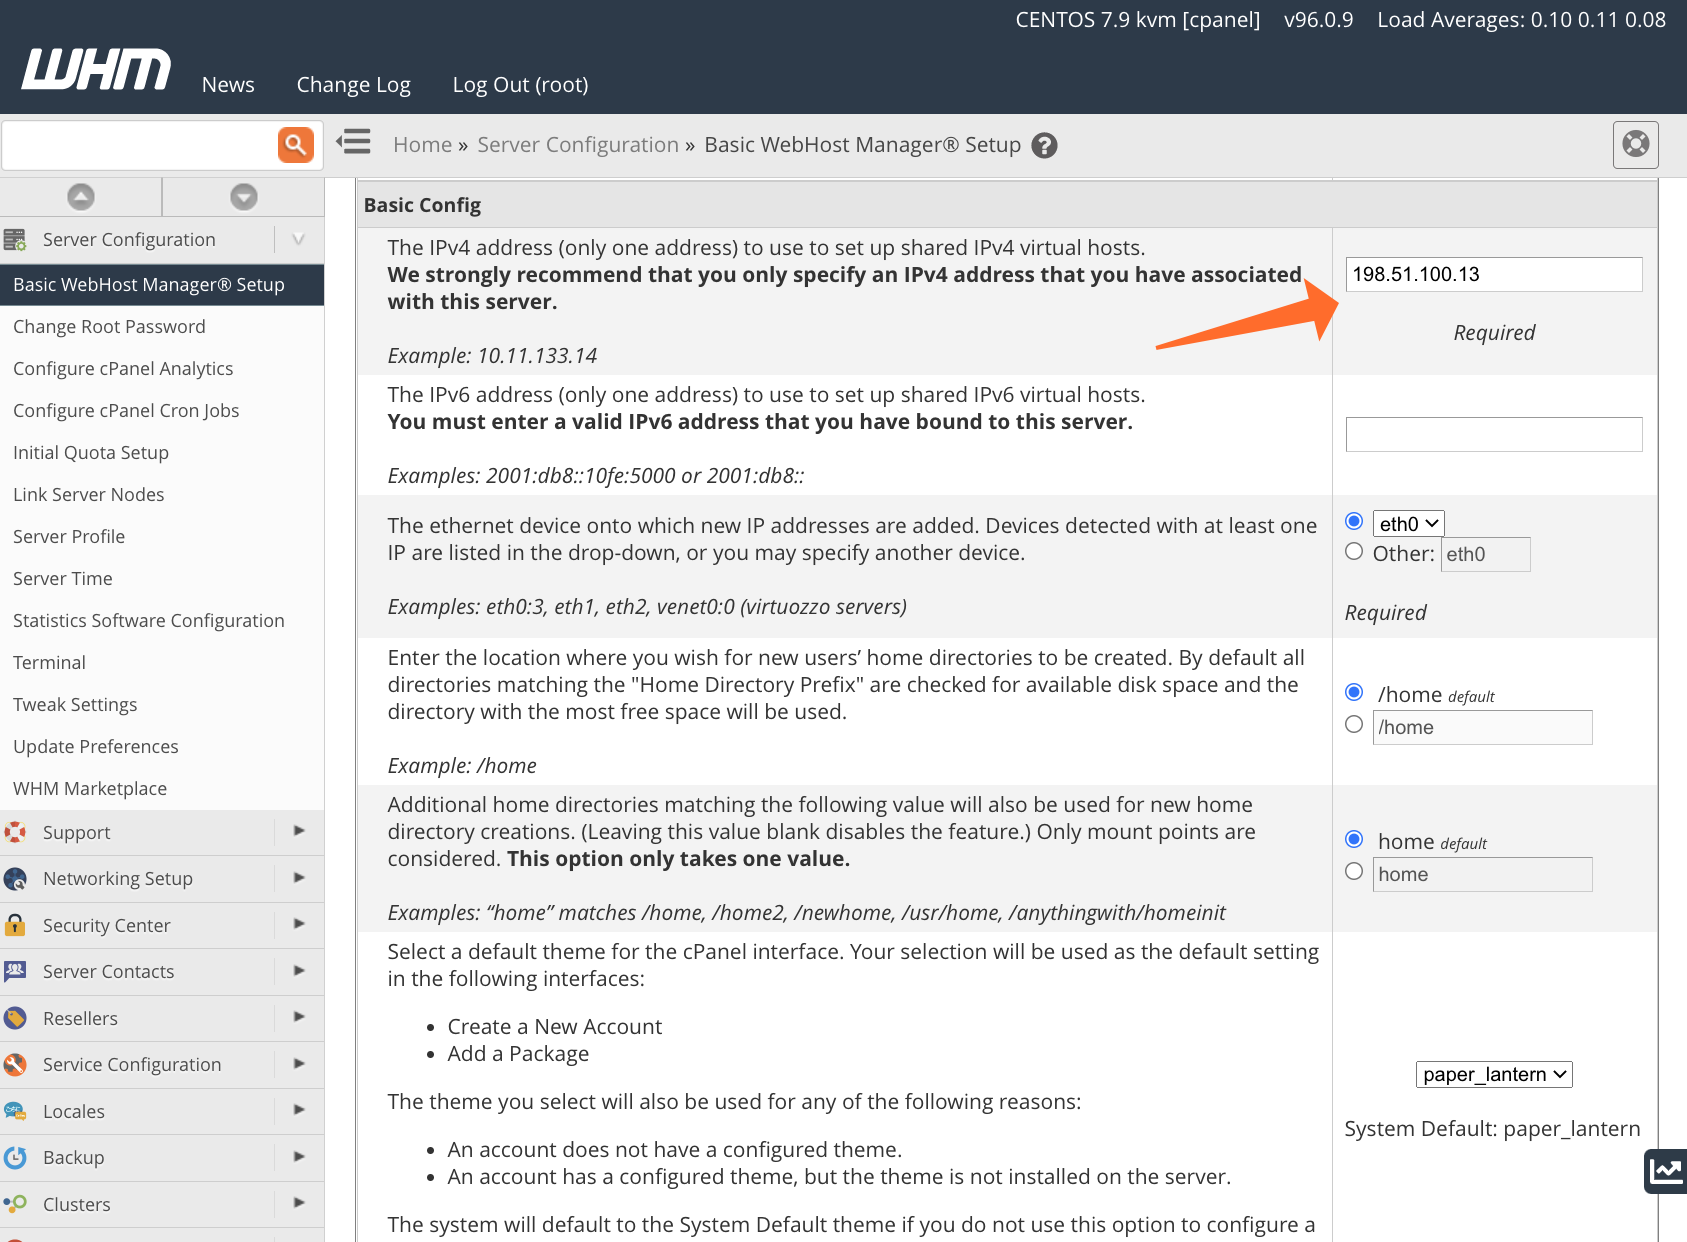
You can change the shared hosting IP address in WHM’s Basic WebHost Manager Setup tool.

In Basic WebHost Manager Setup, scroll to the Basic Config section. The first entry configures the IP address used when creating new virtual hosts for shared hosting accounts. Enter the new address, scroll to the bottom of the page, and click save.
Do not enter an IP address that you have not already added to cPanel with the process we described in the previous section.
Migrate Shared Hosting Accounts to the New IP Address
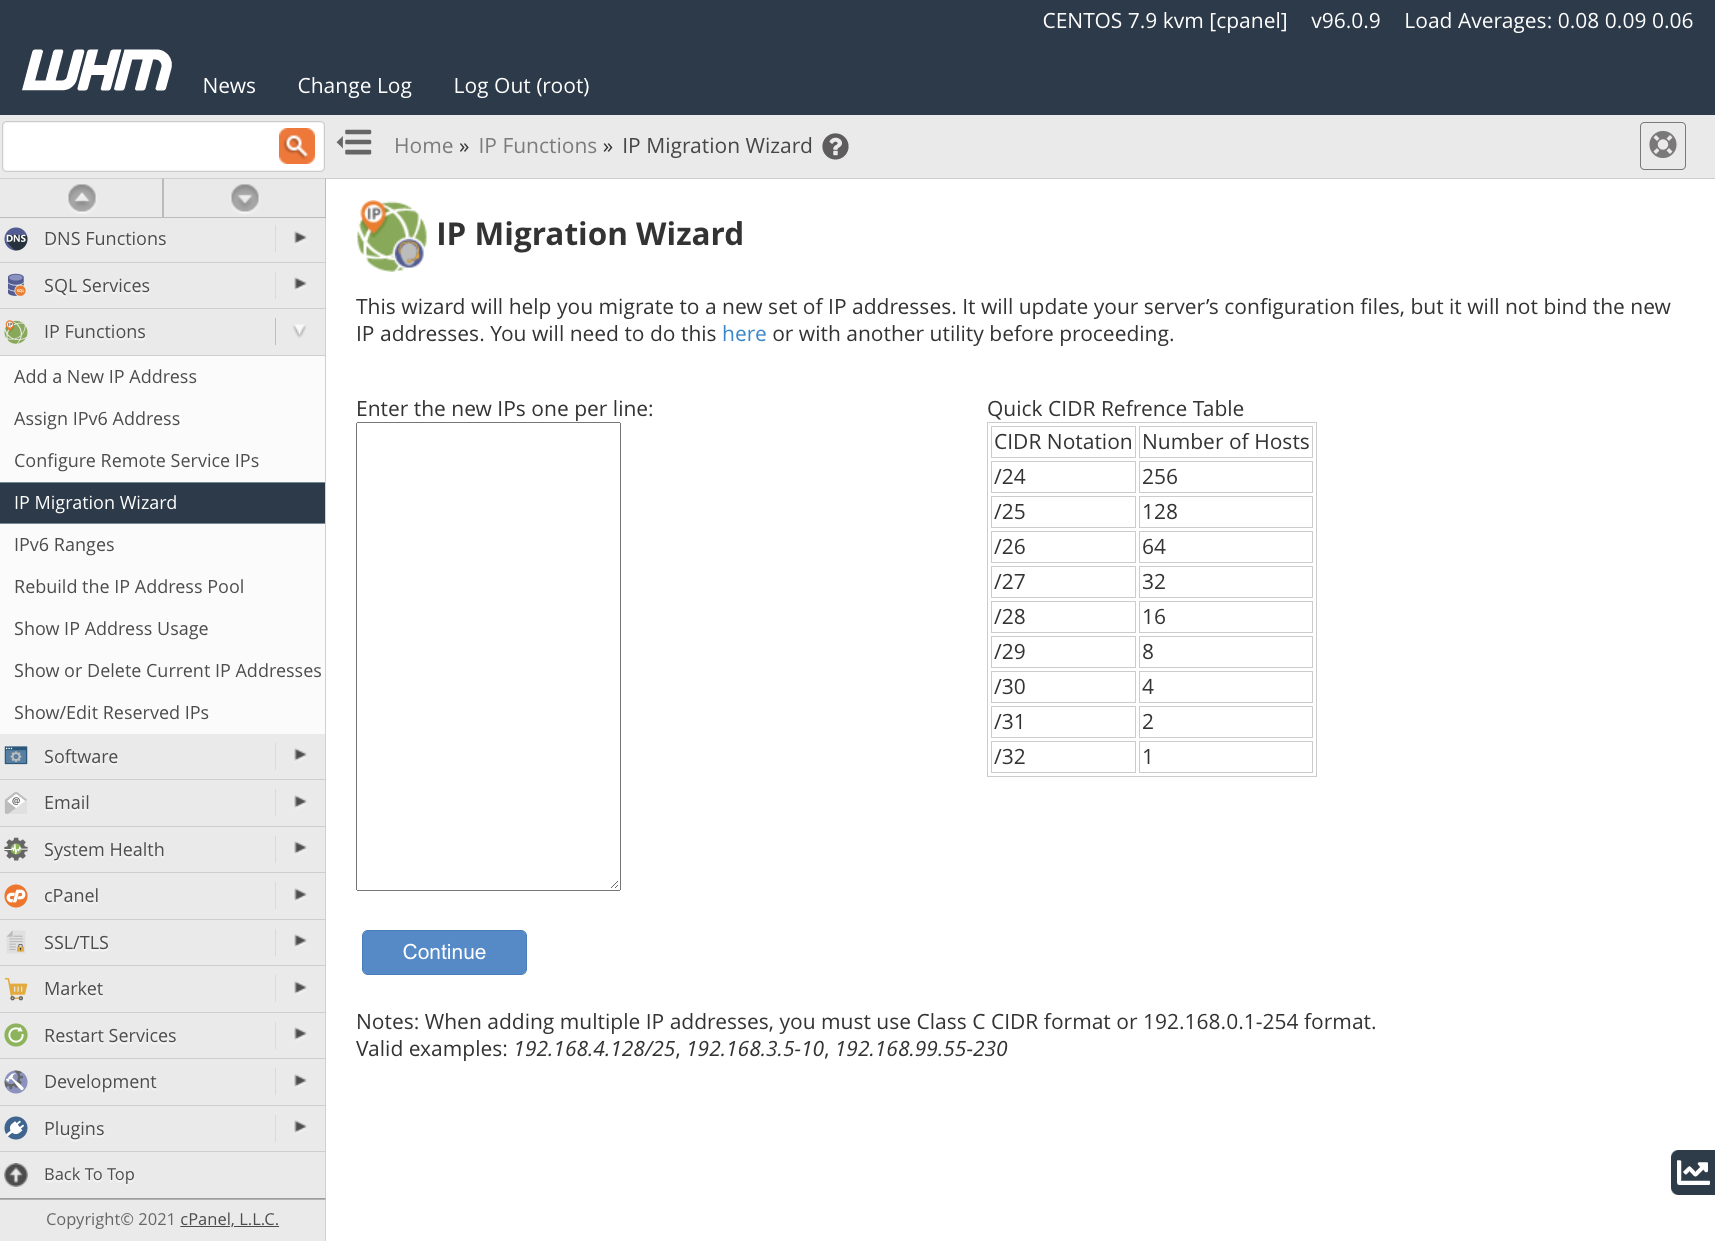
Migrating cPanel accounts to use the new IP is the most complex of the three stages we’re looking at today. But it’s relatively straightforward with WHM’s IP Migration Wizard. Before we begin, you should be aware that:
- You should not add new cPanel accounts during the migration process. If you do, they may not use the new IP address. It’s better to wait until the migration is complete, after which all newly created accounts will use the correct address.
- The full migration process can take up to 48 hours to complete. The server-side changes happen more quickly, but DNS caches across the internet need time to update.
Before we begin, it’s worth emphasizing that the IP Migration Wizard does not add new IPs to your server. You should follow the instructions in this article’s first section to add the new IP addresses before migrating cPanel accounts.

The IP Migration Wizard will walk you through the migration process step-by-step. You should complete each step and pay close attention to the information the wizard displays, including any error messages.
The IP migration steps are as follows:
- Enter the new IP address.
- Confirm the changes. WHM displays a list of current IPs mapped to new IPs so you can verify the accounts and domains that are being migrated. Make sure the planned changes are what you expect. If you confirm and wish to reverse the migration later, you can rerun the IP Migration Wizard, but it may take up to 48 hours to return to the previous configuration. You can also download the translation matrix, a list of domains with their new and old IP addresses.
- cPanel implements configuration changes. This includes updating Apache, FTP, and cPanel configuration files. The new IP address is activated, but the old address is retained so domains continue to be accessible while DNS records are updated.
- DNS migration. The DNS zone files are updated. Be sure to note any errors displayed before progressing to the next step.
- DNS propagation. We recommend that you log out of WHM and wait 48 hours while DNS records propagate. When the waiting period is over, log back in and re-open the IP Migration Wizard. If all is well, it will display a message announcing that the migration is complete.
You have now changed the main IP address used with shared hosting accounts and migrated existing accounts to the new address. If you intend to continue using the old IP address on the server, there is nothing more you need to do. However, if you want to delete the old IP address, you should follow the instructions in the IP Migration Wizard documentation.
If you experience issues connecting to domains using the new IP, ensure that DNS and reverse DNS records are correctly configured. You can check DNS records in WHM’s DNS Zone Manager. You may need to contact your hosting provider for help with reverse DNS configurations.As always, if you have any feedback or comments, please let us know. We are here to help in the best ways we can. You’ll find us on Discord, the cPanel forums, and Reddit. Be sure to also follow us on Facebook, Instagram, and Twitter.


