In today’s digital landscape, where online security is paramount, SSL certificates have become a fundamental tool for safeguarding websites and user data. These certificates encrypt the connection between a user’s browser and a website’s server, ensuring that sensitive information remains confidential. However, despite their critical role, many website owners make common mistakes when it comes to SSL certificates, inadvertently compromising their security. Join us in exploring 8 Effective Ways to Resolve SSL Connection Errors. By following these steps, you can fortify your website’s defenses and build trust with your users.
What Does an SSL/TLS Certificate Do?
Imagine you’re sending a secret message online, like your credit card details when shopping. You want to make sure no one can read it except the person you’re sending it to. That’s where SSL and TLS certificates come in.
SSL (Secure Socket Layer) and TLS (Transport Layer Security) are like security guards for your online information. They make sure your private stuff stays private when it travels over the internet.
An SSL/TLS certificate is like a special badge for websites. It shows that a website is who it claims to be and that it can keep your information safe. When a website has this certificate, you’ll see a padlock icon and “HTTPS” in the web address. It’s like a green light telling you it’s safe to share your secrets there.
How SSL Certificates Work?
When you go to a website using “https://” (like when you shop online), your web browser does some secret handshakes with the website to make sure it’s safe.
1. Your Browser Asks for Proof
Your browser (the program you use to surf the internet) talks to the website’s computer and says, “Show me your ID, so I know you’re who you say you are.
2. The Website Shows Its ID
The website sends back a special ID card called an SSL certificate. This card has a secret code on it.
3. Checking the ID
Your browser looks at the ID card and checks if it’s not expired and if it’s real.
4. Creating a Secret Code
If everything’s okay, your browser and the website make a secret code (like a secret language) that only they understand. They use this code to talk privately.
5. All Set
Now, they have their secret code, and your connection to the website is secure. You can safely send and receive information, like your credit card details.
This secret handshake happens so fast that you don’t notice it. But if something goes wrong during the handshake, you might see an error message, like “SSL connection error.” That means the handshake didn’t work, and it’s not safe to talk to that website.
What is an SSL Connection Error in Simple Terms?
Sometimes when you’re surfing the internet, you might see messages that say things like “SSL connection error.” These messages can pop up for different reasons.
In simple words, SSL connection errors stop you from visiting a website securely. It’s like a warning that tells you there might be a problem with the website’s security. Your web browser might let you go to the site, but it will caution you that it’s not completely safe. This is because, without a valid SSL certificate, bad people could see the information you share with that website.
Here are some common SSL connection errors you might see:
- NET: ERR_CERT_AUTHORITY_INVALID
- NET::ERR_CERT_COMMON_NAME_INVALID
- NET::ERR_CERT_REVOKED
- SSL Handshake Failed
- ERR_SSL_OBSOLETE_VERSION
- ERR_SLL_PROTOCOL_ERROR
Each of these errors means something slightly different, and your browser will show you a message that explains why it happened.
It’s important to know that these error messages can look different depending on the web browser you’re using. For example, the error message in Firefox might not look exactly like the one you see in Chrome.
How to Resolve SSL Connection Errors?
Step 1:- How to Fix SSL Connection Errors in Browsers?
If you see SSL connection errors in the browser, there are a few things you can try to fix it:
1.1 Update Your Brower
Make sure you’re using the latest version of your computer’s browser. You can update it from the browser itself or by downloading the newest version from the official website.
1.2 Check Your Computer’s Time and Date
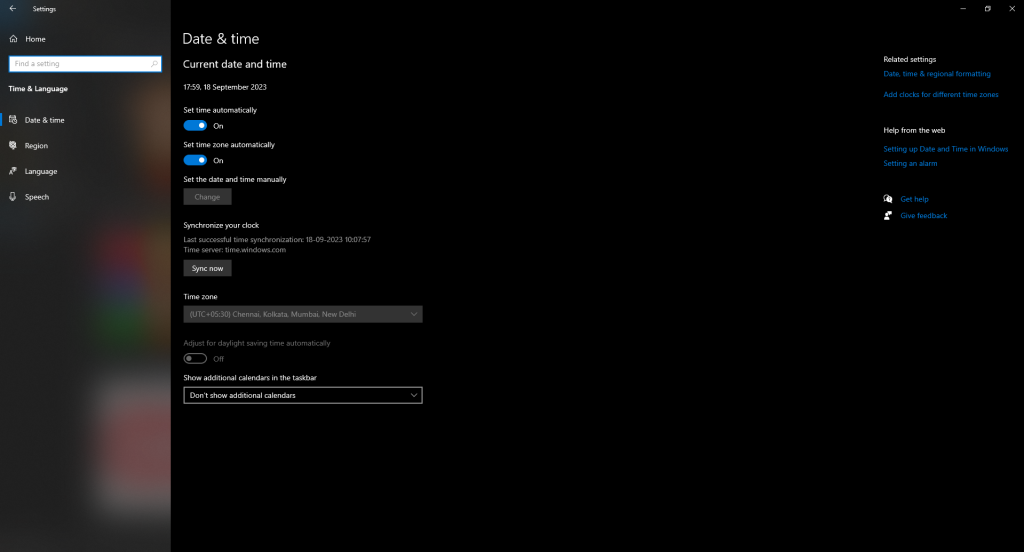
Ensure that your computer’s date and time are correct. SSL certificates are these to verify websites. Incorrect settings can lead to SSL connection errors. On Windows, go to Settings > Time & Language, and make sure “Set the time automatically” and “Set the time zone automatically” are on. On macOS, click the Apple icon, go to Date & Time, and enable “Set date and time automatically.”
1.3 Clear Browser Cache and Cookies
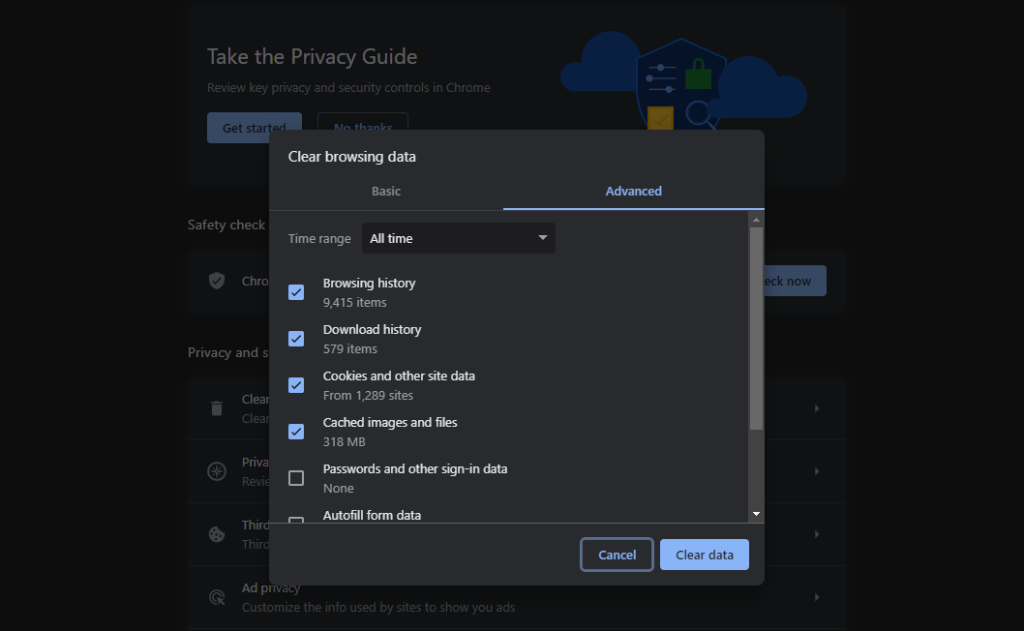
Sometimes, cached data can cause SSL connection errors. In Chrome’s settings, select “Clear browsing data,” choose “Cookies and other site data” and “Cached images and files,” and then click “Clear data.”
Sometimes, stored data can cause SSL connection errors. In Firefox settings, go to “Privacy & Security” and click “Clear Data” under “Cookies and Site Data.”
Sometimes, stored data can cause SSL connection errors. If you’re using a Mac, iPhone, or iPad, you can clear cookies and cache in Safari settings by going to “Clear History.”
1.4 Clear SSL Certificates
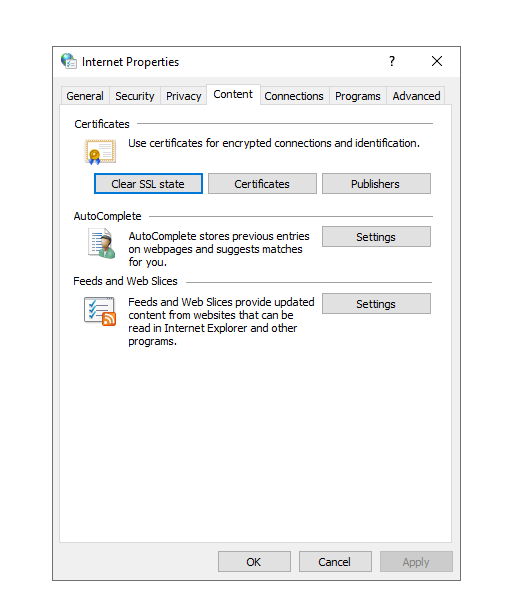
This is a bit technical. On Windows, search for “Internet Options” in the start menu, go to Content, and click “Clear SSL slate.” On macOS, go to Utilities > Keychain Access, select “System” under Keychains, and delete any SSL certificates related to the website you’re having trouble with.
1.5 Temporarily Disable Antivirus and Firewall
As a last resort, try disabling your antivirus and firewall temporarily. This isn’t usually necessary, but it might help in rare cases. If none of these steps work, the problem might be on the website’s server rather than your computer.
After these steps, try accessing the website again. If the SSL connection errors continue, the issue might be on the website’s end, not your device.
Step 2- Ensure Your Website Has SSL Installed
To begin, you need to make sure your website has something called an SSL certificate. Think of it as a digital security certificate for your website. This SSL certificate helps keep your website and your visitors’ information safe.
Here’s how you can check if you have SSL installed and, if not, how to get it installed, especially if you’re using BigCloudy Web Hosting:
2.1 Check for SSL
- Log in to your web hosting account (if you use BigCloudy).
- Go to a section called “Site Tools” (you can usually find this in your hosting dashboard).
- Look for something called “SSL Manager” under the “Security” category.
2.2 Install SSL
- In the SSL Manager, you’ll see a list of your website domains.
- Pick the domain where you want to add SSL.
- Then, you’ll need to choose an SSL certificate (there might be different options available).
- Once you’ve made your choice, click on “Install.”
Step 3- Reinstalling SSL for a Secure Website
Sometimes, even if you’ve already installed SSL on your website, there can be hiccups when trying to access it securely using HTTPS. This can make your browser show a warning, saying that the SSL certificate isn’t trusted.
Here’s how to fix this:
3.1 Go to Your Hosting Account
If you’re using a service like BigCloudy, log in to your hosting account.
3.2 Find the SSL Manager
- Look for a section called “Site Tools.” This is where you’ll usually manage your website settings.
- Inside “Site Tools,” navigate to “Security” and find “SSL Manager.”
3.3 Delete and Reinstall
- Inside the SSL Manager, you’ll see a list of your SSL certificates.
- Find the one causing issues (if you have multiple) and delete it.
- After deleting, you can reinstall the SSL certificate fresh.
Reinstalling SSL is like giving your website a new, shiny lock. It can fix problems where your browser doesn’t fully trust your website’s security. So, if you ever see a warning about an untrusted SSL certificate, you know how to solve it.
Step 4- Use a Web SSL Checker to Find SSL Errors
If you ever see an SSL error on your website, there’s a handy tool you can use to figure out what’s going wrong. It’s called a “web SSL checker,” and it works like a detective for your website’s security.
Here’s how it helps:
4.1 Check the Certificate
- A web SSL checker looks at something called the “certificate chain of trust.” It’s like making sure all the locks on your front door are working correctly.
- It also checks if this certificate is connected to a trusted “CA” (Certificate Authority). Think of the CA as the master key that makes sure your lock is secure.
4.2 Check Important Details
- This tool doesn’t stop there. It also tells you important stuff like when your SSL certificate will expire, the website’s name it’s connected to, a unique certificate serial number, and more.
- It’s like checking all the details on your ID to make sure everything matches up.
4.3 Find the Problem
If anything in these checks fails, the web SSL checker will give you a clue about what needs fixing. It’s like a detective pointing you in the right direction. So, next time you’re worried about SSL connection errors on your website, turn to a web SSL checker. It’s like calling in the experts to make sure your online security is top-notch!

Step 5 – Renew Your SSL Certificate for a Secure Website
When your SSL certificate gets close to its expiration date or if it expires, it’s like your website’s security guard taking a break. This can lead to problems, and your website might not work for your visitors.
Here’s why you should renew it and what can happen if you don’t:
5.1 Keep Your Website Working
If your SSL certificate expires, your website might not load properly for your visitors. It’s like the door to your website being locked.
5.2 Prevent Problems
When your website isn’t secure, it can cause all sorts of issues. Visitors might not trust your site, and it can even affect your search engine rankings. Think of it as making sure your store’s front door is always open and welcoming.
5.3 Renew in Time
- To avoid these problems, you should renew your SSL certificate before it expires. It’s like making sure your security guard is always on duty.
- Renewing your SSL is usually a straightforward process, and it keeps your website safe and accessible.
- So, remember to renew your SSL certificate on time. It’s like ensuring your website stays open for business and your visitors can trust it.
Step 6 – Switch All Website Links to HTTPS for Added Security
When you set up an SSL certificate on your website to make it secure, there’s one more important step: making sure all the links on your site use HTTPS. Let’s break it down:
6.1. SSL Makes Your Site Safe
SSL is like putting a strong lock on your website’s door, so nobody can peek at what’s inside.
6.2 Mixed Content Can Be a Problem
Sometimes, even after you’ve added SSL, some parts of your site might still use the old, unsecured HTTP. This is called “mixed content.”
6.3 Browsers Give Warnings
When mixed content is present, web browsers get worried and show warnings. It’s like a guard dog alerting you if something’s not right at your door.
Now, to avoid these SSL connection errors and make sure your site is super safe.
6.4 Change All Links to HTTPS
You need to go through your website and update every link so that it uses HTTPS instead of HTTP. It’s like changing all the locks on your doors to be super secure.
6.5 Benefits of HTTPS Everywhere
- When all your links use HTTPS, your site is fully secure. It’s like having not just one lock but a whole fortress around your website.
- So, remember to switch all your links to HTTPS to keep your site safe and avoid those browser warnings. It’s like ensuring your website is a trusted and secure place for your visitors.
Step 7- How to Fix Mixed Content Errors After Moving to SSL/HTTPS in WordPress?
7.1 Mixed Content Errors Explained
- Mixed content errors happen when some parts of your website still use insecure HTTP links instead of secure HTTPS links. These parts can include images, scripts, and stylesheets.
- When mixed content errors occur, you won’t see a secure padlock icon in your website’s address bar, and it might be labeled as “Not secure.”
7.2 Solutions for Fixing Mixed Content Errors:
1. Using a Plugin (Recommended for Beginners)
- This method is easier but may slightly slow down your website’s performance, especially on the first-page load.
- Ensure you have an SSL certificate for your WordPress website.
- Install and activate the “Really Simple SSL” plugin. You can find detailed instructions on how to install a WordPress plugin in our guide.
- After activation, go to Settings » SSL in your WordPress admin dashboard. The plugin will handle your SSL/HTTPS settings and fix mixed content errors automatically.
2. Manual Fix (More Effective, Better Performance)
- This method is more efficient but requires manual work.
- Go to Settings » General and check that both the ‘WordPress Address‘ and ‘Site Address‘ have HTTPS URLs. Change any ‘http’ URLs to ‘https’ and save your changes.
- To find and replace old HTTP URLs in your WordPress database, use the “Better Search Replace” plugin.
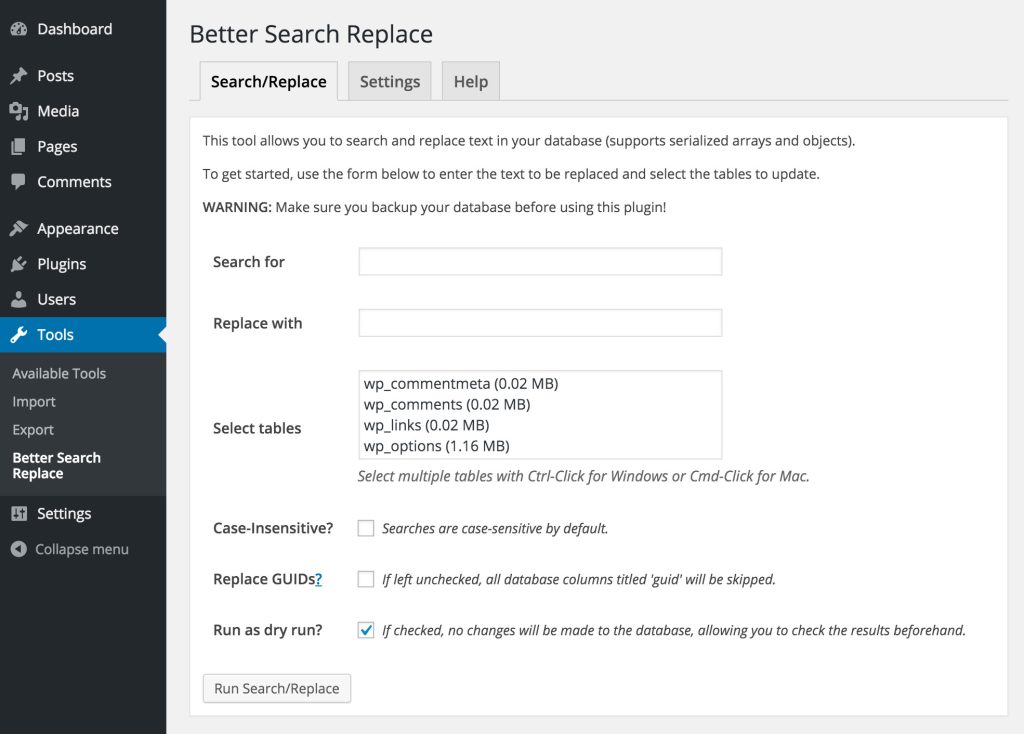
- After activation, go to Tools » Better Search Replace and enter your website URL with HTTP in the ‘Search’ field and your website URL with ‘https’ in the ‘Replace’ field.
- The plugin will update URLs in your database.
- If you still see mixed content errors, use your browser’s Inspect tool to locate the resources causing the errors and note which website files they load from.
- If you’re comfortable with editing WordPress files, access theme files using FTP or your web hosting file manager, and replace ‘http’ with ‘https’ in each file.
- Alternatively, contact the theme developer and ask them to update their theme to use WordPress best practices for loading files. This will fix the HTTP/HTTPS issue.
- For mixed content loaded by a WordPress plugin, don’t edit plugin files yourself. Instead, notify the plugin developer and request an update. While waiting, you can either disable the plugin on your site or look for an alternative plugin.
Step 8 – How to Fix Too Many Redirects Errors?
8.1 Problem Explanation
Sometimes, your website can have a problem called “too many redirects.” This happens when you try to make your website secure with SSL/HTTPS, especially for the admin area.
8.2 Solution
To fix this, you’ll need to change a file called “wp-config.php.” This file is like a set of instructions for your website.
If you’re using a service like BigCloudy, follow these steps:
1. Go to “Websites” and then “Files” in your account.
2. Find your website’s name and click “Manage Files.”
3. Inside your website’s folder, you’ll see the “wp-config.php” file.
If you’re using FileZilla (a program), do this:
- Connect FileZilla to your website. You’ll need some login information from your web host.
- In FileZilla, look for the “wp-config.php” file in your website’s folder.
Making the Change:
- Open the “wp-config.php” file.
- Copy and paste the following lines of code at the very bottom of the file, just before the line that says “That’s all, stop editing! Happy blogging.
php

define('FORCE_SSL_ADMIN', true);

// In some setups, HTTP_X_FORWARDED_PROTO might contain

// a list like "http,https," so we need to check for "https"

if (strpos($_SERVER['HTTP_X_FORWARDED_PROTO'], 'https') !== false)

$_SERVER['HTTPS']='on';- Save the file after making these changes.
That’s it! You’ve fixed the “too many redirects” error, and your website should work smoothly with SSL/HTTPS.
Conclusion
In the digital age, SSL certificates are vital for online security and trust. Avoid these top 6 SSL connection errors to protect your site, and user data, and build visitor confidence. Choose the right certificate, monitor expiration, and follow security best practices for a safe and trusted online presence.
In case you have found a mistake in the text, please send a message to the author by selecting the mistake and pressing Ctrl-Enter.


